For most of the car models, there is only one plug for the cigarette lighter. However, you have thousands of devices that need the current from that plug to work. It does have to cite, but sometimes, you will want to stop the dash cam to use the lighter.
You might want to use the car vacuum cleaner, and it needs to plug in, or you have a dash camera mounted on your vehicle. If you want to meet your needs, you should hardwire the dash cam. On the other hand, if you do not know the method to hardwire any dashcam; this post will help you with it.
Find the place you will locate the dash cam
For installing the camera, the first rule you should not overlook is not to let it affect your view. This device might allow you to observe everything that happens on the road. Find the most suitable place, and do not let it distract you while driving. The best place often is chosen behind the rear mirror.
At the same time, the camera should be within reach of your arm while you are sitting in the seat. There will sometimes be; you will need to rotate the cam a little bit to adjust the view of the cam. Make sure you will not have so much difficulty in adjusting the view as it is critical for the important footage.
Where Is the fuse box?
Since we will need power from the car to run the dash camera, you should figure the which place the fuse box is set. For most of the circumstances, you can find it under the dashboard. You can access it without too much trouble, it is covered by a removable panel, and then you can locate the fuse box.
Carefully check on the driver’s as well as the passenger’s side, it should be on one of two sides. However, if you have not found it; you should look through the manual that comes along with the car. In case you do not keep it anymore, search on the internet, it might help you to find the fuse box quicker and easier.
Route and hide the power cable
When you route the wire, it is always better for you to cover up the wire. You will not want the interior of your car to look messy, so locating the wire will improve the appearance. Trying to put it under the interior panels will be a splendid decision.
First and foremost, you should tuck the wire into the headliner. From that point, the wire should be located along the headliner. Then, hide the power cable along the A-pillar. Let it be behind the interior panels and then hide it underneath the carpet.
For most of the cases, you can tug the rubber trim along the pillar, and take it out. The gap revealed after you have taken the rubber out might be enough for the wire. Put it there; then the cable can run from the headliner to the fuse box.
Meanwhile, in the case that it does not work, you can hide the power cable behind the A-pillar cover. Removing the cover to access and set the wire in that area. Many of the A-pillars can be popped out without any trouble. Consult the manual or mechanic if you do not know how to remove it.
Choose the right fuse
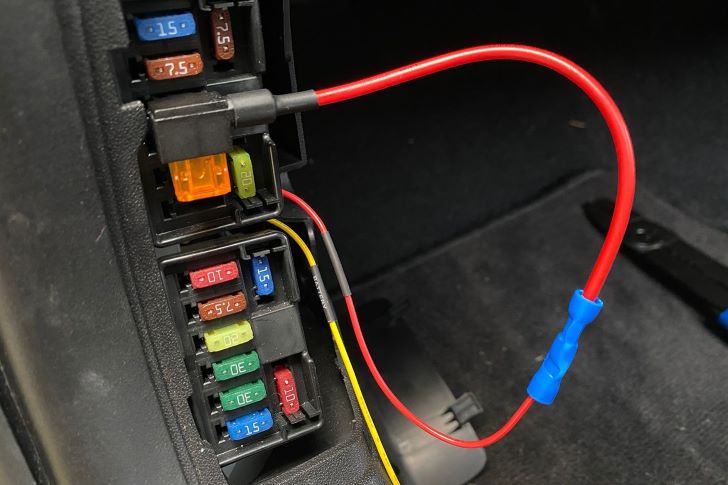
There is a slight difference for you to realize when selecting the fuse that you will plug the power cable in. The fuse will have power all the time, and one just has power when you start the car. To differentiate, you will need a circuit tester to find out.
When you use a dash cam, no doubt that you will prefer it to switch on when you start the car automatically. The latter fuse will help you with this, as It only delivers the power when you start the vehicle. You should connect the power cable to this type of fuse.
By connecting with that fuse, it is not necessary for you to turn off the dash cam. It will immediately switch off when you turn off your car. You can plug in the fuse that always has the power, however, if the camera can not switch on and off automatically, it is totally not convenient for you.
Connect the wire to the fuse
Remember, you will need to cut the power supply. That means you will need to take out the key from the ignition. You might have an electric shock if you do not turn off the power. To prevent this might happening, carefully check this before dealing with the wiring.
A pair of pliers or fuse pullers might be necessary for removing the tool you have chosen to connect the wire to. Removing it gently will ensure that you do not cause any damage to the fuse. Then plug the wire of the dash cam to receive the current.
You also need to connect to the ground to make the dash cam work. Look for the ground around the area of the fuse box, for most of the car, the ground will be somewhere in that area. Another time, you should check the manual if you do not find it.
Besides, you should notice that the ground point is covered by the panel. Connect the negative wire with the ground by removing the bolt and adding the lug from the wire. After that, you should test if the connection whether it is firm.
After you have already connected the wire to the power source, still, there is the excess wire. Use the zip tie to bundle all the power cables together. It will make it look nicer and tidier; it is clear that it will be much better to keep them behind the panel.
Test the installation
Put the key into the ignition and turn the machine on. The dash cam should switch on and begin to record once you start the car. If the camera does not work, then, it means your installation is not correct. Start over the process to define what problem has occurred.
Commonly, it is because the wiring is not firm, see the connection to the fuse box and the ground point. If the dash cam then works correctly, your task is done. Put the cover panel back in its place. And make sure you hide all the excess wire behind the panel.


